Playing Enshrouded alone has its charms, but the real fun begins when you get all your friends together. However, someone will have to host the game at all times to make it accessible for everyone. The solution to that is a dedicated server. Below is everything you need to set up a free dedicated server in Enshrouded.
Free Dedicated Server Setup in Enshrouded
First, before you can run your own Enshrouded server, you’ll have to download the Enshrouded Dedicated Server program as well. You can find it in your library if you already have the game. Then do the following:
- Launch Enshrouded Dedicated Server.
- Copy the Public IPv4 Address and save it for later.
- Close the Command Prompt.
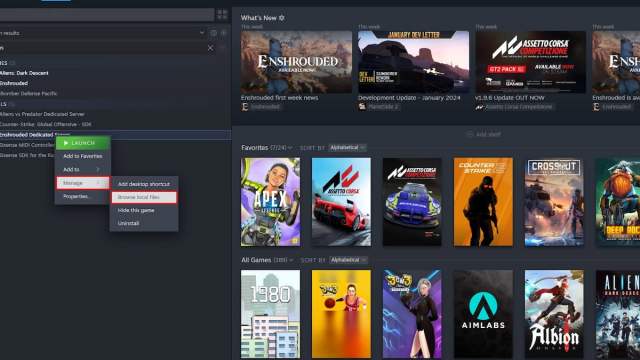
- Right-click Enshrouded Dedicated Server in your library – Manage – Browse Local Files.
- Find “enshrouded_server.json” and open it with a text editor, such as Notepad.
- Change the name and the password of the server, and then save and close the file (use a strong password if you are going to make it available online).
Firewall Setup
Now, you’ll need to set up your firewall and open some ports so the dedicated server can communicate with players through them. To do that, click on the Start menu, search for PowerShell, right-click the PowerShell app, and run it as an admin.
Paste the following code into the PowerShell window and hit Enter.
New-NetFirewallRule -DisplayName "Enshrouded Server" -Direction Inbound -LocalPort 15636,15637 -Protocol TCP -Action Allow New-NetFirewallRule -DisplayName "Enshrouded Server" -Direction Outbound -LocalPort 15636,15637 -Protocol TCP -Action Allow New-NetFirewallRule -DisplayName "Enshrouded Server" -Direction Inbound -LocalPort 15636,15637 -Protocol UDP -Action Allow New-NetFirewallRule -DisplayName "Enshrouded Server" -Direction Outbound -LocalPort 15636,15637 -Protocol UDP -Action AllowOnce the commands are executed, you can close that window. Also, if you only want the dedicated server to be visible in your local network, the steps you’ve done so far are enough for that.
Port Forwarding
Finally, if you want to make your dedicated Enshrouded server visible outside your network, you’ll have to set up some port forwarding rules. You can access them using your router’s control panel, which you can most often open simply by typing “192.168.0.1” in your browser’s search bar and hitting Enter.
If that doesn’t work, you can use Command Prompt to find your router’s IP address:
- Press Windows + R (Windows is usually between Ctrl and Alt) on your keyboard.
- Type in CMD and click OK.
- Input ipconfig and press Enter.
Now, the Default Gateway is the IP address of your router, and you can access its settings with it using the same process as above. Also, save the IPv4 Address for later (it’s your device’s local IP address).
Once you open your router’s settings, find the Port Forwarding Settings (Application/Game settings is also common).
There should be an Add Rule button. Click it and select the following settings:
- IP Address/Destination: your PC’s local IP address you saved earlier.
- Inbound and Outbound ports: 15636 lower bound and 15637 upper bound.
- Protocols: TCP/UDP both.
Once you’ve adjusted all of the settings, add the port forwarding rule, and you can close the settings tab. Now, you can run your dedicated server, and it should appear within ten or so minutes in the Enshrouded server list.
However, if there are multiple access points between your main router and your PC, you’ll have to set up the port forwarding rules on each of them.
Favorite the Server on Steam
You can also favorite the server on Steam to save yourself some waiting time. This is how you do that:
- Open Steam.
- Click View on the top and then select Game Servers.
- Switch to the Favorites tab and press the + button on the bottom.
- Type in the server address with the following format: “Public IPv4 Address:15637.” You should have the public IPv4 address saved from when you launched the Enshrouded Dedicated Server.
- Press OK, and the server will soon appear on the list.
Once the server appears on the list, connect to it using the password you set up initially. You can also use this to join your server without going through the game’s main menu.
How to Get a Paid Hosting Dedicated Server in Enshrouded
The downside of hosting your own dedicated server for Enshrouded, as well as any other game, is that your PC has to run it all the time for it to stay up. It also means that your PC’s resources will be expended on the dedicated server.
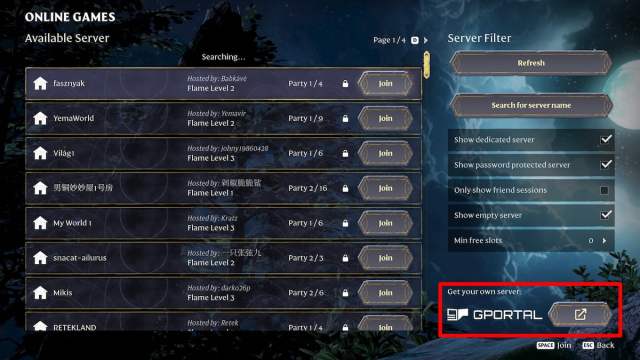
However, you can buy a dedicated server, which will stay up at all times and require almost zero effort from you. It will also have better ping and other benefits, such as DDOS protection. GPortal is the main service provider for this, as you can access their site through the in-game menu.
How to Host Your Own World in Enshrouded
If you simply want to host your own world in Enshrouded without all the dedicated server complications, then you’re in luck. The only thing you need to do is click Play in the main menu, then Host, and set up the world settings. Once you’re done with that, your friends will be able to join your world immediately.
With all that info, setting up a dedicated server or two for Enshrouded should be no problem for you. Also, if you want to learn more about the game, like how to upgrade your backpack, for example, check out the links we included below.
About the author
