
In this Elden Ring Frost Samurai Build Guide, I’ll be presenting the Rime Ronin build, a Samurai setup that emphasizes the Frostbite status effect. This build is designed to work well in New Game Plus, but it can also be used effectively throughout most of the main game. I’ll go into detail with how you can play with this build in both contexts, providing strategies and tips to help you get the most out of the Frostbite focus in your Samurai gameplay.
Elden Ring Frost Samurai Build Guide – Rime Ronin
A Dexterity/Intelligence build that uses the Nagakiba and the Chilling Mist Ash of War.
We have over 110 Elden Ring builds. Each one is meticulously crafted to offer unique playstyles, strategies, and experiences, ensuring there’s something for every adventurer in the Lands Between. Whether you seek the raw power of heavy weapons, the finesse of spellcasting, or the versatility of hybrid builds, our collection has you covered. Explore the depths of the game’s mechanics and unleash your full potential with our diverse array of builds.
Elden Ring Frost Samurai Build Guide – Equipment
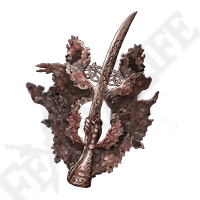
First, let’s examine the weapon used in this build: the Nagakiba. This katana is a fantastic choice because of its extended range and innate bleed buildup, providing both reach and bleed damage. The Nagakiba is accessible very early in the game, making it ideal for starting a build from New Game, as you don’t have to wait long to obtain it. Its versatility and effectiveness make it a solid choice for various combat scenarios throughout the game.
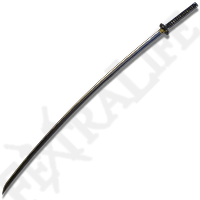
I’ve set the Nagakiba to the Cold Affinity using the Chilling Mist Ash of War. This Ash of War can be found in Carian Manor, which isn’t too far into the game. If you’re eager to get it early, you can head there directly, though you’ll need to defeat one boss to acquire it since it’s locked behind the boss fight. Even with that requirement, it’s a relatively quick process to obtain Chilling Mist and begin using it in your build. The Cold Affinity provides additional Frostbite buildup, enhancing the weapon’s bleed capabilities, making it a potent choice for early and mid-game content.
What I like about this Ash of War is that it deals decent damage. It deals about 100% of the damage of a regular attack. It’s sweeping, so it can hit multiple enemies. It adds Frostbite buildup in an area for a little bit of time, and it adds extra Frostbite buildup to your weapon swings, which already have a decent amount because of the Cold Affinity. So it’s not very hard at all to inflict Frostbite with this build.

Frostbite is a really good status effect, and it not only debuffs the enemy, allowing you to do more damage with your swings, but it also rips off a chunk of their health based on their max health. So the harder enemies are to defeat, the more damage they’re going to take. So this is really good in boss fights or co-op or New Game Plus, etc. It’s very, very good there.
The drawback is that, unlike Bleed, you can’t repeatedly apply Frostbite without resetting the status effect. This requires dealing damage with fire or waiting for Frostbite to wear off, which can be inconvenient during fights where you need sustained damage. To address this, the build includes a way to reset Frostbite, allowing you to reapply it and boost your damage during longer battles. While this isn’t the central focus of the build, it’s a helpful feature to increase your overall damage output when needed.
Another great thing about this setup is that, unlike Bleed, the Frostbite effect can trigger repeatedly during regular fights with enemies. What’s particularly useful about this is that when Frostbite activates, enemies flinch for a moment, giving you a window to continue attacking. This brief pause can be crucial in preventing interruptions during your R1 combos. By anticipating when Frostbite will trigger, you can maintain your attack flow without fear of getting hit, allowing you to capitalize on the opening it creates.
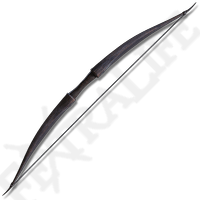
The other weapon we’re using for this build is the Black Bow. This is a regular bow that operates the way a shortbow does, meaning that you can jump in the air and shoot and then shoot again when you land instantly, which is fantastic for mobility. It allows you to get arrows off a lot easier. And it’s something you would see in a Samurai build, I think. The Samurai starting class starts with a katana and a bow, so this is not too dissimilar from something you would see if you chose that.
In this build, the bow is an optional but useful tool for added flexibility. It provides a ranged attack to thin out enemies before engaging in close combat, which complements the Samurai playstyle. The bow is great for shooting fire arrows to clear the Frostbite status effect, allowing you to reapply it with a Chilling Mist attack, potentially taking 20-30% of a boss’s health with each cycle.
Additionally, you can use bleed arrows or other specialized arrows to boost your damage, depending on the enemy’s resistance. However, the bow is not the main focus; it’s more of a utility to add range and reset Frostbite when needed, while also offering strategic options in specific game scenarios.
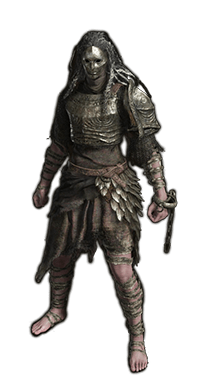
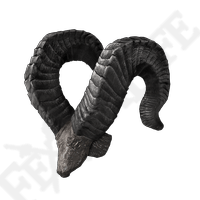
The armor set I use for this build is the Zamor set, which isn’t obtainable early in the game—you find it much later. If you want to run this build in the early game, you’ll need a different armor set. The Samurai armor could be a good option, especially if you start with the Samurai class, and it fits the Samurai theme. However, I prefer the Zamor set for its unique style, and it aligns well with the frost theme of this build. If you’re looking to emphasize that frosty aesthetic, this armor is a solid choice, but you’ll need to progress further into the game to acquire it.
Zamor is very frost-themed and it’s just more for the look of things than anything. But if you were min-maxing this build, you would probably wear heavier armor with better protection. You have the equip load for it. You could also wear the body armor and use something like Okina Mask, which will give you extra dexterity, which will increase your damage.
There are ways to min-max this build for optimal performance, but I’m leaning more toward fashion with this setup. If you’d prefer to focus on min-maxing, consider using heavier armor to gain more poise while still maintaining a medium roll. This approach offers better protection and stability without sacrificing too much mobility. Ultimately, it’s about finding the right balance between performance and style, so adjust the build according to your priorities.
Elden Ring Frost Samurai Build Guide – Talismans & Gameplay
For this build, I use the Bull-Goat’s Talisman to achieve the 51 poise breakpoint with the current armor. If you use heavier armor with higher poise, you won’t need this talisman, freeing up a slot for something else. This is an optimal way to min-max if you prefer a different armor set, but I like the flexibility of using lighter armor while still reaching the crucial poise level, which is why I chose it for this build.
Besides that, I also use the Rotten Winged Sword Insignia and Millicent’s Prosthesis. Millicent’s Prosthesis provides five extra Dexterity, boosting damage, and both talismans increase damage as you repeatedly strike. Since this build relies on close combat and quick, successive attacks, especially when trying to trigger Frostbite or Bleed, these talismans are invaluable for maximizing your damage output. When in melee range, you can R1 spam to stack the effects and increase your attack power, making these talismans excellent choices for this build’s playstyle.
For the last talisman slot, there are a few options to consider. The Shard of Alexander can boost the Chilling Mist attack, which is useful if you hit with the blade. It’s a solid choice for increasing your damage output.
Alternatively, you might choose the Dragoncrest Greatshield Talisman for additional protection, which can be beneficial if your armor set doesn’t offer much defense. This talisman can provide an extra layer of survivability in tougher battles.
Another option is the Lord of Blood’s Exultation, but it’s less effective with this setup. The build only has about 38 bleed buildup per hit, which isn’t enough to trigger Bleed regularly, even during boss fights. This talisman might activate once in a boss fight but isn’t a reliable boost for general gameplay. Therefore, it’s more situational compared to the Shard of Alexander.

Other talismans that are good early on are the Green Turtle Talisman. This is a very stamina-hungry build. Chilling Mist costs a pretty good amount of stamina, and when you use Barrage with your bow or you run and shoot, jump and shoot, or you just R1 spam with a Nagakiba, you chew through your stamina. So Green Turtle Talisman is not a bad choice as well.
A good thing about this build, despite some critique, is that it doesn’t rely heavily on buffs. The Chilling Mist buff also serves as an attack, allowing you to integrate it into your combos and overall gameplay. This way, you’re not constantly pausing to apply buffs, which keeps the action flowing.

Patch 1.07 improved Chilling Mist, speeding up its animation and doubling the duration of its Frostbite effect from 20 to 40 seconds. This enhancement makes Chilling Mist much more viable than before, allowing you to use it less frequently while still maintaining the Frostbite buff on your weapon. It’s a significant quality-of-life improvement, reducing the need for constant rebuffing and letting you focus on combat. I really appreciate this change and find it beneficial for this build.
As you go around in the landscape, you just use the attack naturally on groups of enemies to get area-of-effect damage, and then you buff your weapon at the same time, and then, you know, it triggers on regular enemies in about two swings most of the time. So if you don’t kill something in one hit, you almost always trigger Frostbite. Which is not something that happens with Hemorrhage, so that’s nice.
Elden Ring Frost Samurai Build Guide – Recommended Attributes
When it comes to attributes, we have 55 Vigor, 30 Mind, 19 Endurance, 18 Strength, 65 Dexterity, 50 Intelligence, 7 Faith, and 9 Arcane. We don’t need any Faith or Arcane for this build, so disregard those.

When it comes to Vigor, we have 55 here. This is enough for the period of the game for the beginning of New Game Plus, in my opinion. You should have plenty of protection with what you have here. It’s not like a lot of protection. Between that and 55 Vigor, you’re not going to die very easily. You probably want to take this up to 60 throughout New Game Plus, though.
Mind is at 30 here, and you can get away with less Mind than this. Chilling Mist doesn’t use that much FP. You’re not casting any spells. You can get away with less Mind here if you want. But there isn’t a ton of other places we need to put attribute points, and this allows you to skew almost all of your flasks to the HP side of things, allowing you to be a lot more aggressive and not worry about your flask count, because you always have healing.
Endurance is at 19 here, mostly for the stamina, but you can go higher, and probably going up to something like 30 isn’t a bad idea. You could take a few points out of Mind and put some in Endurance, or as you level up from here, keep increasing Endurance. This is the thing I would do next with this build. This will not only get you more protection if you don’t want to roleplay a Samurai with Samurai-type armor or use the Zamor set, but it will give you extra stamina that will make attacking a lot easier, because you’ll be able to spam without running out of stamina, which is what’s going to happen to you if you have less than this.
When it comes to Strength, we have 18 here. This is the minimum requirement to use the Nagakiba one-handed. Sometimes when you’re swapping back and forth between your bow and your Nagakiba, you don’t have a lot of time to two-hand it before you need to get an attack off, and the damage increase isn’t that much for two-handing when you have very little Strength. So meeting that requirement for one-handing at 18 Strength is nice.
Dexterity is at 65 and Intelligence is at 50, and these are two damaging attributes here. The Nagakiba with Cold Affinity scales best with Dexterity up to 50, so you want to start there and get Dexterity up to 50. If you’re playing a regular new game build, you want to focus on Dexterity to get your damage up, if you’re just talking about which attribute for damage. And then once you hit 50, you’ll start focusing on Intelligence, and then once you get to 50 Intelligence, you’ll focus on Dexterity once again. That’s kind of the order in which things are scaled the best here.
However, I do want to point out that if you want to play like a Spellblade build. You would rather have more Intelligence because you want to cast spells with this build, you could easily go 65 Intelligence and 50 Dexterity, or 75 Intelligence, 40 Dexterity. You wouldn’t lose out on that much damage. So that’s totally up to you. That’s not what I’ve done here because that’s not the focus of my build, and I’ve already done a Spellblade-type Samurai, but you absolutely could if you want.
From here onward, I recommend increasing Dexterity and Intelligence. They’ll give you about the same amount of damage at this point. So it’s really up to you which one you want to pump, physical damage or magic damage. But you probably want to take both of those up to 80, and then if you’re still playing with this build by then, you can start focusing on Strength. Strength has the worst scaling, and you get like one damage per point if you’re lucky. So it’s not one I would recommend doing for a while, but when you hit 80, 80, then you can focus on Strength.
Elden Ring Frost Samurai Build Guide – Final Tips

Before wrapping up, here are a couple of final tips for this build. If you’re using the Flask of Wondrous Physick, you have a few options. I recommend the Greenburst Crystal Tear, as this build can be quite stamina-hungry, so it’s helpful to keep that in your flask. You can also use the tier that boosts magic damage, but it’s less effective since your build does only about 40% magic damage. Alternatively, the tier that increases damage with successive hits is a solid choice if you tend to R1 spam during combat. You could also opt for tiers that boost Dexterity, Strength, or Intelligence, providing a flat damage increase.

Regarding Great Runes, Godrick’s Great Rune is a strong option for this build. It grants +5 to all attributes, which is beneficial given that you use Vigor, Mind, Endurance, Strength, Dexterity, and Intelligence in this build. This all-around boost can significantly enhance your build’s performance, offering increased health, stamina, and damage output. With these tips, your build should be even more effective.
So that wraps up our video for the Rime Ronin build. I hope you guys have enjoyed it. As always, let us know if you have questions or other tips in the comments below. We have a ton more builds coming for Elden Ring and Shadow of the Erdtree so stay tuned for those. If you need help finding the spells, items, or equipment in this build, and securing some personal objectives, make sure to check the Elden Ring Map.
