In this Elden Ring midgame Paladin Build, the Templar, I’ll share the evolution of the beginner Paladin build, this is a level 50 version of this build, so if you’ve been wondering how to play a Paladin as you advance the game then read on to find out.
Ultimate Elden Ring Paladin Build Guide: Templar
The Templar class stands out as a versatile choice for players due to its tankiness, combining defense and decent damage-dealing counters while having the ability to heal. This guide will help you optimize your Templar build from the get-go.
We have over 110 Elden Ring Builds now, for all classes and playstyles. This Templar Build is recommended for midgame.
Elden Ring Midgame Templar Build Equipment
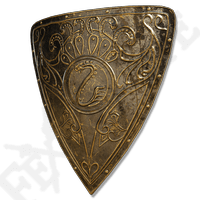
For this setup of the templar build, you’re going to be using the Brass Shield, which you were probably already using. This is absolutely just a fantastic shield for 16 strength that pretty much outclasses any shield you can get up to this point, barring great shields, which have huge strength requirements.
The sword I’m using for this build is the Noble’s Slender Sword this drops from the Nobles that kind of wander around the landscape in packs. You can find them in Raya Lucaria, you can find them in Liurnia of the Lakes, you can find them in Limgrave. It does take a while to farm this sword, and it took me about an hour and a half, so if you don’t want to farm this sword, you can just use a long sword or broadsword that the character begins with or any other weapon that you want that has minimal stat requirements that don’t have more than about 16 strength and about 10 to 12 Dex just to keep those stats down.
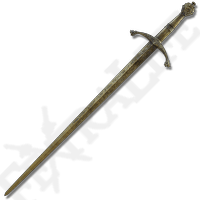
The reason I chose this sword for this build is that it has a slightly longer reach than the long sword and it has a slightly better critical rating. It has a 110 critical rating versus 100 and you do stagger enemies regularly with this build, which means when you go in for that critical strike you’re going to do more damage.
As far as armor pieces for this build, I use the Greathelm because it looks very Templar-y, just pure fashion. It’s very heavy and has good defensive stats. and I use the Mausoleum Knight Set which just looks awesome and has very good defensive stats.
Elden Ring Paladin Build Talismans and Gameplay
Now for talismans, I’m using the Green Turtle Talisman, the Assassin’s Cerulean Dagger, and the Curved Sword Talisman.
The Green Turtle Talisman is absolutely vital for this build because you just chew through stamina when you’re blocking and attacking, and you need to recover stamina as quickly as possible in order to be able to keep blocking and not get guard broken. And to be able to go on the offensive, the Assassin’s Cerulean Dagger might seem out of place here because it gives you FP back on critical strikes and you might think “Well, how are you doing critical strikes with this build?”.
I’ll be talking about that here in just a little bit but, it’s good for getting FP back that allows you to stack a lot of your flasks to the hp side of things and get away with few FP flasks because you can just regain it throughout the natural course of combat and a lot of the weapon abilities you use and spells you use cost a lot of FP so this will help manage your FP a little bit well you can absolutely sub this one out if you want something else like the Blessed Dew Talisman is also a great pick here or Erdtree’s Favor.
If you like either of those, you can sub this one out for that. Lastly, we’re utilizing the Curved Sword Talisman. This enhances your block counter damage this is absolutely outstanding for this build because you do tons of Block Counters and you want them to hit as hard as possible.
So what is a Block Counter? A Block Counter is when you block an attack with your shield and then immediately hit R2 and you consume quite a bit of stamina to do sort of like an upward slash in this case, with this weapon and it deals substantial damage, it’s very fast and it deals incredible stagger damage. Usually, it will stagger average enemies regular enemies in one hit which allows you a critical strike which then is where the Assassin’s Cerulean Dagger comes into play.
It usually takes two on some enemies and then three on bosses and things like that but you are absolutely gonna be a stagger machine when you are playing this build, like if you’re playing co-op and you’re tanking for everyone, you’re going to be staggering bosses, regularly allowing your team to just go to town on them when they’re down. This is a very defensive build, it’s very reactionary because basically, the way you’re going to play is you’re going to approach enemies with your shield up, wait for them to connect with your shield, and then hit R2. It’s not sort of dissimilar from a parry build except it’s easier to do because you don’t have to parry time the window for a parry. You can instead just wait for them to hit your shield and you have like maybe a half second afterward to hit R2.
This is where the Ash of War: Barricade Shield comes in super handy because it costs very little FP, and it reduces the stamina damage you take when blocking so you’re going to actually lose very little stamina in blocking, and enemies tend to rebuff off it, so when you go to do your Block Counter, you’re not in any danger of a follow-up attack from them. And again, because that costs FP as well, Assassin’s Cerulean Dagger helps to regain some of that FP the two spells we use for this build are Blessing’s Boon and Aspect of The Crucible: Tail.
Blessing’s Boon is absolutely fantastic, it puts a heal over time on you and friendly allies in a radius around you, and you can actually hold R1 and just wait for them to get around you and then let go so you can kind of preemptively cast it, if you know they’re going to come to you but it’s really really good even when you’re playing solo because if you’re using something like the Blessed Dew Talisman and then you put this on you, it lasts like 90 seconds or two minutes. It’s got a pretty long duration you’re going to have a lot of health regen naturally over the course of a fight and then you’re going to have FP replenishment from Assassin’s Cerulean Dagger so you don’t really have to worry about using potions too much in a fight you can worry about fighting during the fight which is fantastic.
The other spell that we use for this is Aspect of The Crucible: Tail. This is your AoE ability, this class has very very little AoE especially using a straight sword, it doesn’t have like a wide arcing swing so you need that AoE and this thing has pretty good poise too if you get about halfway through the casting time if you hold down R1 it’s pretty much uninterruptable almost and if you keep holding it down it’ll do two sweeps just like the Crucible Knight does and that second one has a much wider AoE and the thing about this spell too, is as incredible staggered damage meaning that like you can drop a troll and like two casts of this spell to its knees like before it even has a chance to move which is crazy and you just run over and do a critical attack on it absolutely fantastic, and it gives you that AoE that you need.
Talking about the Ash of War that I put on the Noble’s Slender Sword for this build, I either use Sacred Blade or Golden Vow. Your Sacred Blade is good to give you a ranged option and it buffs your damage for about 15 seconds. You do absolutely incredible damage during this time, so if you need burst DPS like if you’re fighting Rennala, and she’s about to drop, you throw out a blade, and then you’re buffed for 15 seconds so when you’re attacking, you do incredible damage really really good if you can pull this off repeatedly and keep this buff up.
It’s kind of hard to do in fights with aggressive bosses because it takes about a second to pull this off, so it’s not always useful, but the damage is absolutely incredible when you need it and it’s also good in catacombs areas where there are undead because if you hit enemies with it while your blade is buffed, they don’t regenerate so it’s really good for dealing with scenarios where they have like a lot of skeletons and you just can’t be asked to try and hit them again when they’re on the ground. Golden Vow has a longer buff period and it increases your defense as well as your attack. It doesn’t give you nearly as much attack but it also buffs your group including spirit summons, so if you plan on summoning spirits or if you plan on co-oping it’s really good. You combine that with the heal-over-time ability or spell, then you can really really buff your party and play like that Paladin playstyle if you want.
Templar Build Attribute Recommendations
Talking about stats for this build, what I’ve done is increase my Vigor to 20 my Endurance to 20, and then met the minimum requirements for the brass shield at 16 Strength, obviously, and then I started cranking Faith. This not only buffs the weapon damage you deal because you’re using Sacred Blade or Golden Vow, but it’s also going to increase the potency of your incantations, whether that’s the healing potency or the damage potency, and as you accumulate more and more incantations throughout the game, they’re going to have higher and higher faith requirements and you’re going to want them to hit harder and harder, so this is kind of preparing you for future incantations, even though it doesn’t have too much of an impact at this moment in the game.
Moving forward from this point, I’m going to keep increasing Vigor to give myself more health because this is a tanky build, keep increasing my Endurance. As long as I’m gaining stamina out of the endurance stat, I don’t really care too much about equip load because I have heavy armor and I’m fine already, and keep increasing faith to use better and stronger incantations and to make sure my weapon does more damage and that those incantations do more damage.
Stat Focus:
- Vigor: Increases health for survivability in close-range encounters.
- Endurance: Increases Stamina and Equip Load
- Faith: Enhances damage output with Sacred Blade or Golden Vow, also increases the potency of incantations.

Final Tips For The Templar Paladin Build
Don’t fall into the trap of being only defensive. It can happen that you can fall in love with Block Counter (Guilty as charged.) and that you’ll be facing enemies and you’ll just stop R1 attacking. You’ll just keep waiting for them to attack so that you can hit R2 and sometimes you’ll miss openings where you could literally just deal damage to an enemy or a boss because you didn’t hit R1 because you’re just sitting there waiting to hit R2, so don’t forget to R1 when you can and make sure you’re ready for your Block Counter but don’t forget that you can actually attack with R1.
Use Barricade Shield liberally anytime you’re facing a tough enemy or an enemy that has a hard-hitting weapon that you know is going to take substantial stamina off if you block, make sure you use Barricade Shield on even a bunch of little enemies because the amount of stamina they rip off you can pile up real real fast if you’re blocking three or four attacks in a row so when in doubt use Barricade Shield it, actually puts your shield out for like a split second while you’re casting it that actually will block attacks even though you’re not holding the block button when you’re pressing it so that’s really really good.
Another thing I want to mention with this build is the charged R2, or when you hold R2 completely until it actually fires or does a thrust attack. In this case, it does incredible stagger damage. It does about the same amount of stagger damage as a Block Counter, so some enemies that take two Block Counters to stagger, if you get in one good thrust and then a Block Counter, you’ll stagger them. Or like the bears for instance, like in the Mistwood Forest, they take three Block Counters so if you can get in two Block Counters in a thrust, you’ll actually stagger them so keep that in mind. In some cases, you can lead a fight with a thrust. Sneak up get a thrust on them and then get two Block Counters or a Block Counter and stagger the enemy.
Lastly, I didn’t mention this in the equipment section, but make sure you upgrade your Finger Seal. your Finger Seal is going to give you improved incantations as well. Do not neglect this if you are short on upgrading materials. Make sure you prioritize your weapon but upgrade your seal when you can because you do want your incantations to be as strong as possible and this is a good way to make sure that happens.
So that’s pretty much it for our Templar build, I hope you guys are enjoying it, it’s absolutely devastating, it’s very very good for a new player and it has better damage than you’d think at this point in the game so it’s very very fun to play.
As always, let us know if you have questions or other tips in the comments below. We have a ton more builds coming for Elden Ring and Shadow of the Erdtree so stay tuned for those. If you need help finding the spells, items, or equipment in this build, and securing some personal objectives, make sure to check the Elden Ring Map.
