
PC gaming is something that brings a lot of flexibility over the uniform console experience, but it can get daunting with figuring out the best settings for the Nvidia Control Panel and the rest of your PC. It pays off to tune everything though, because you can reduce stutters and potentially even get higher fps in your games with a few quick tweaks.
This quick guide will run you through the Nvidia Control Panel to ensure your settings help your Nvidia GPU run at its best. We also have a few other tips at the end to reduce the chance of stutters and low fps in your games.
What is Nvidia Control Panel and how do you access it?
This is a built in GPU management application made by Nvidia that’s typically automatically installed on your PC with an Nvidia GPU. Nvidia also installs GeForce Experience by default. You can download the programs from Microsoft if it’s not installed.
Nvidia Control Panel is the more technical program of the two. It provides a variety of options to apply global override settings to your games and applications, and it does a few unique things in of itself. It’s the easiest way to set advanced features without any hassle.
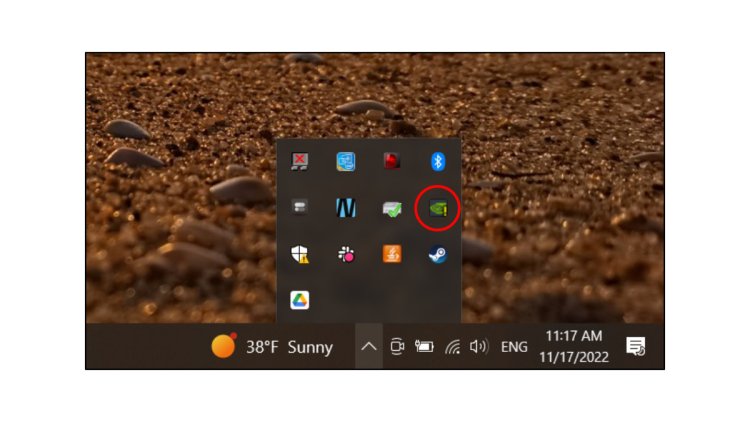
To access Nvidia Control Panel, right-click on your desktop and see if it appears in the list. You may need to click “show more options.” If you still don’t see it, try checking in your “hidden icons” section on your Windows task bar.
- Images via PC Invasion
Once you have Nvidia Control Panel open, we can apply the best settings for gaming use. You should land at the “Manage 3D Settings” sub-menu by default. If not, navigate to it. This guide keeps things simple, so we’ll stick with the “Global Settings” tab. However, take note that you can tune specific games later if you’d like to explore more advanced options.
Our recommendation is to generally keep the Nvidia default settings. We’ll tweak a few things, though. In most cases, it’s also suggested to leave settings on “Application-controlled” so you can tune your settings uniquely in each game. This is because most games have varying degrees of quality with graphics implementations. You’ll typically want to choose for yourself what works best versus Nvidia automatically choosing something. One common example is temporal anti-aliasing (TAA), which can cause motion blur in some games, while other games offer great TAA.
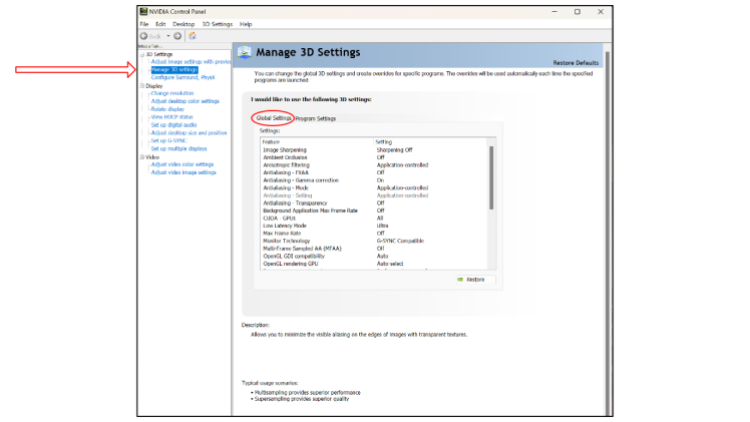
Image via PC Invasion
The best Nvidia Control Panel settings for PC gaming
Here are the settings that you should change from defaults:
- “Low Latency Mode” to “Ultra”
- “Power management mode” to “Prefer maximum performance”
- “Preferred refresh rate” to “Highest available” if it is not set to that.
- “Threaded optimization” to “On” if you have four or more CPU cores.
These settings will help minimize system latency, reduce the chance for stutters (particularly in some DirectX 12 games), ensure your CPU scales gaming workloads better, and that your GPU matches your monitor maximum refresh rate.
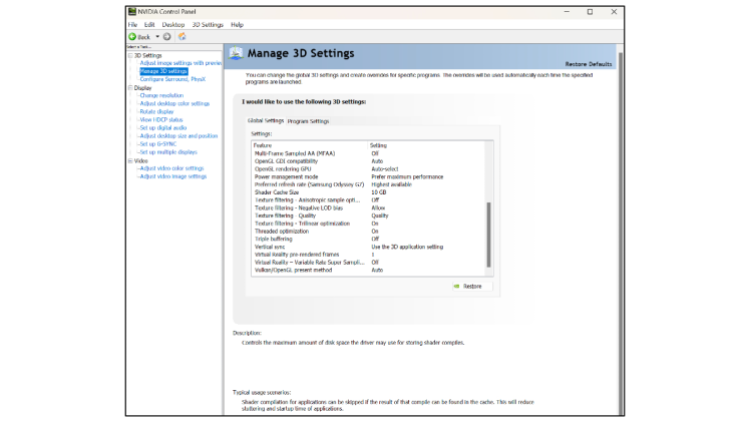
Image by PC Invasion
You can also change your “Shader Cache Size” if you play a lot of different games and have storage space to spare. Caching shaders improves game performance the next time the game needs to simulate that event, so a larger cache size means you’ll keep a longer history of compiled shaders instead of your PC deleting old stuff in storage to free up space. Fortnite and Warzone are two examples where you’ll see a lot of stutters until you cache enough shaders. You might even notice some faster loading times.
The maximum Shader Cache Size setting is 10GB, which isn’t much to set aside given how cheap SSDs now are per terabyte. The default value is 2GB, so you can pick any size, really.
You should also see if your monitor is G-Sync/Free-Sync compatible. If so, you can enable that to eliminate tearing. Just keep in mind you trade off some additional display latency with VSync on for that smooth image. VSync latency isn’t that bad though if you have a 120Hz monitor or higher. Turning VSync on just syncs your game to the same refresh rate as the monitor, so it’s technically slower.
G-Sync is an improved version of VSync, and G-Sync is similar to the now standard Adaptive-Sync feature. This allows the output framerate to stay in sync with the monitor even if your fps drops below what the monitor can output. This is also sometimes referred to Variable Refresh Rate (VRR) tech. The result is less visual stuttering on screen. Even if you’re a competitive player, you should give VSync another try if your monitor is high refresh and it supports G-Sync, Free-Sync, or there’s mention of Adaptive-Sync support. There are even up to 500Hz monitors now to let you get away with using modern VSync tech for visual perfection.
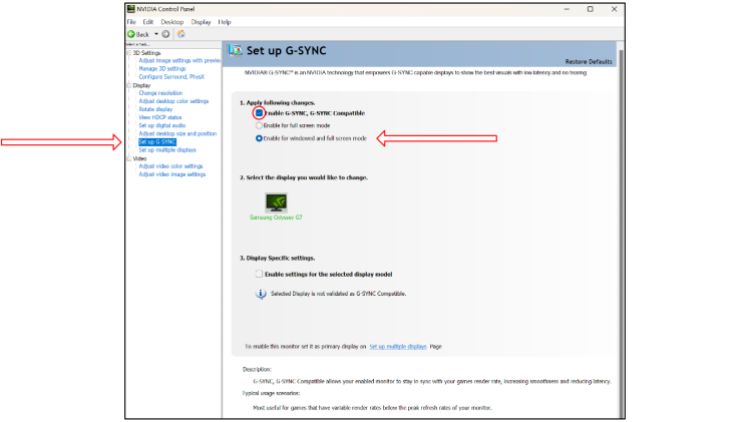
Image by PC Invasion
Check these settings too
Now let’s run through a few more Windows settings to ensure your gaming PC is at its best.
- Select: Settings > System > Display > Graphics Settings. Ensure Hardware-accelerated GPU scheduling is on. Restart the computer if it was off.
- In that same Graphics Settings section, manually set your games to “High Performance” (not Let Windows Decide: High Performance). This will help to prevent stutters in some of your DirectX 12 games.
- Select: Settings > System > Power & Sleep > Additional Power Settings. Set the computer to “High Performance” so Windows doesn’t throttle the CPU or other hardware.
- If you meet the requirements for Resizable-BAR, you should also enable that for a few more fps in the games which benefit from that setting.
Making these simple settings changes in both the Nvidia Control Panel and Windows will ensure your PC is generally optimized for the best gaming experience. Of course there’s plenty more you can tune as well to get the most out of your hardware, but these are simple and proven tweaks with no downsides.
