Atomic Heart: Testing Ground 6 Walkthrough
Testing Ground 6 is one of the first mini-dungeons you’ll come across while exploring Atomic Heart’s quasi-open world. Located close to the Monorail Station, Testing Ground 6 contains a number of valuable mod blueprints, however, getting to them can be somewhat challenging if you’re not a big fan of puzzles.
Although you can find mod blueprints without delving into Testing Grounds, the very best upgrades can only be found in these underground areas. Every Testing Ground contains four or five blueprints and there’s a good chance you’re going to be able to make use of at least one of them regardless of which weapons you’re trying to max out.
How To Access Testing Ground 6
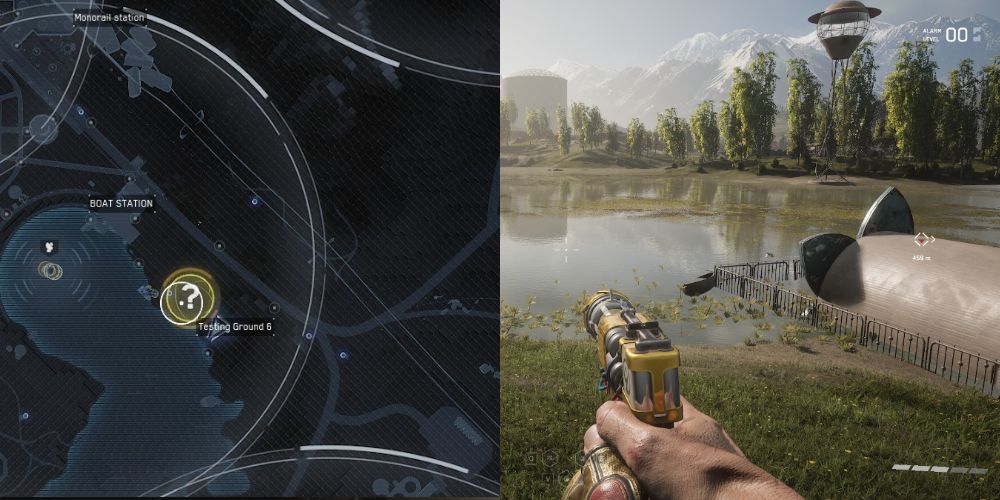
You’ll probably pass by Testing Ground 6’s entrance without even realizing it while following the main story. The entrance can be found southeast of the Boat Station and looks like a closed-off drainage pipe when you first encounter it. To open the entrance you’ll need to climb the tower located across the river; the one with the number 6 on it.
Step onto the platform at the base of the tower, and you’ll be taken to the top where you can interact with a Terminal that gives you access to nearby cameras. Take control of the camera facing the entrance and use the prompt to open it. Make your way to the pipe, and you’ll eventually reach an elevator that will take you to Testing Ground 6.
Testing Ground 6 Walkthrough
As soon as you exit the elevator turn left to find a Breakroom where you can save your progress. Exit the Breakroom and hug the left wall to find a corridor leading to a couple of smaller chambers with some chests and cabinets. Loot what you need and make your way to the other side of the big room. Pass through the open gate to find Testing Ground 6’s first puzzle. Start by making your way to the other side of the room where you can find a red valve. If stand in front of the valve and look to your right you’ll notice a hole in the wall – that’s where you’ll need to get to.
You can use the valve to rotate both X-shaped platforms. Once you spin them a couple of times you’ll notice a second valve on one of the platforms. Turn the first valve two times, jump to the platform and turn the second valve two times, and then jump back and turn the first valve one time. You can now climb the left platform and use it to jump over to the right one. Solve the puzzle lock on the door on the floor and make your way back to the second valve, which is now on the left side of the platform behind the wall. Turn it two times, then go back to the first valve and turn it one last time. Jump over to the right platform again and go through the unlocked door and the hole in the wall to find yourself in a room with lots of cabinets.
Instead of going through the left exit, which leads to a dead end, turn left and take a few steps forward to find another hole in the wall. Go through the wall to reach a room with giant pistons and a turbine on the ceiling. Use the Breakroom to your left if needed and then proceed forward to find a strange-looking perpetual motion engine with a bronze chest instead of a head. Open the chest to find the Extended Magazine mod blueprint for the MP. Turn left after exiting the room and make your way up the stairs.
As soon as you enter the room on the upper level, the door will close behind you, and you’ll be ambushed by a bunch of Pchela and Owl drones. Fight them off and then leave the room through the hole in the floor. Once down, you’ll need to take the left exit to proceed, but you can first look to your right to find a chest. Navigate through the tunnels, and you’ll soon reach a room with some pipework. Go to the other side of the room to find a small chamber with another perpetual motion engine and a silver chest. Open the chest to find the Collimator mod blueprint for the Kalash.
Leave the room and look to your left to find a stairway leading to the upper floor. Follow the corridor until you reach a room with a puzzle similar to the one you came across shortly after entering Testing Ground 6. There’s also a Breakroom here if you want to save your progress. Go to the platform and climb up the metal cabinet before jumping to your left through an open space in the grating. From here, you can jump back on top of the cabinet and then dash jump to the other side of the room.
Alternatively, you can turn around and drop through a hole in the floor to find a chest, a second valve, and a door with a puzzle lock. Loot the chest, unlock the door, and go through to make your way back to the first valve and the metal cabinet. Climb on top of the cabinet just like before to reach the other side and exit the room. Turn left to find a small room with the third perpetual-motion engine and a gold chest. Loot the chest, and you’ll be rewarded with the Electromagnetic Emitter mod blueprint for the Electro and the Battering Blow mod blueprint for the Snowball. Use the nearby elevator to exit Testing Ground 6 and return to the overworld.


